
Acrylic is a great material to work with on your CNC system, as there is so much you can do with it, from lighted edge-lit signs to cool-looking inserts for speaker boxes, and other projects that need some “bling”. However, there are some basic things you need to know in order to ensure success and give you a smooth finish when cutting Acrylic on your STEPCRAFT CNC system Unlike wood, Acrylic will have a “sweet spot” in terms of speeds, feeds, and depth per pass that you want to be aware of. Below are 8 important guidelines.

Guideline 1 – Secure Your Material
We can not stress enough how important it is to secure your Acrylic properly to your STEPCRAFT. Failure to do so will result in excess vibration and flex which can ruin your cut or result in a very poor finish. Whether you use the white stock table that comes with your STEPCRAFT or you have a T-Slot Table, you need to use a solid sacrificial board and attach it to the bed of the CNC. We recommend using 3/4″ or 1/2" MDF board. This material is very solid and flat. If you are using T-Slot you can simply clamp the MDF to the table, but if you are using the stock table, then use several pieces of double-sided table to adhere the MDF to the white formica top. We recommend using 2″ wide double sided tape such as X-Fasten Double-Sided Tape (Removable). Be sure that you use a removable tape and do not use permanent carpet tape or foam tape as you will have a very hard time removing them from the MDF and table when done with your project.
Once the MDF is secured to the table, use a couple pieces of double sided tape to secure the Acrylic to the MDF. Make sure you clean off the MDF to remove dust so the tape will adhere. Good quality acrylic, such as cast acrylic, usually comes with paper stuck to the surfaces to protect it from scratches. I usually remove the paper from surface that I am cutting to prevent the end mill from gumming up. I leave the paper on the bottom surface though, and attach that to the MDF with the X-Fasten tape. If I am doing a simple project then I might leave the paper on both sides as it is easy to remove, but if my project has a lot of details like engravings or pockets then I will remove it from the cutting side so I do not have to weed it out.
You might also want to clamp down the outside of the acrylic as well to ensure that the tape does not break loose. This will ensure that the Acrylic is fastened as solid as possible which will minimize any movement, flex or vibration.
Guideline 2 – Use The Right Bit
You will never get the best results using wood bits to cut acrylic as cutting and chip removal is key. We recommend using a bit that is specifically designed for cutting acrylic. We found that we get the best results using an “O-Flute” end mill. If you read online, many posts will have you use the largest diameter end mill that you can. While this might be true on an industrial-size CNC, on the STEPCRAFT, we have the best success with 1/8″ diameter “O-Flute” end mills. The one we recommend the most is: Amana 51410 1/8″Dx1/8″SHK SPIRAL O PLASTIC
Guideline 3 – Set The Correct Feed Rate

We have found that the best feed rate for a STEPCRAFT 2 series CNC machine using a STEPCRAFT HF-500 Spindle is 30 mm/sec and using a KRESS 800W or MM-1000 Spindles, we found the best feed rate to be 38 mm/sec. A good rule of thumb would be to set the feed rate on the lower end and then you can always increase the speed using the F-SET setting in UCCNC while the job is running. If you determine that you are getting the best results with an F-SET of 120% then you can simply multiply the current feed rate x 120% and make that the new feed rate for that tool. Then the next time you run a job, leave F-SET to 100%. Of course, on the Kress or MM-1000 you can simply make RPM adjustments by turning the speed control knob while the job is running.
The idea is to get good clean chips from your cut without any melting of the plastic as its being cut.
Guideline 4 – Set The Correct RPM

We have found that the optimal cutting RPM for acrylic with the recommended O-Flute bit above is 18,000 RPM. While you can use a faster RPM, you might have to increase your feed rate to prevent melting of the plastic. Our tests have shown the above to give the best results, but there may be a slight deviation between different brands/types of acrylic. Keep track of your settings and results so you can easily recall then for future job runs.
Guideline 5 – Set Your Pass Depth

Our normal guideline is 1/2 the diameter of the bit, which is a good starting point for many types of materials. However, a pass depth of .0625″ seems to provide the best results using the above end mill and settings.
Guideline 6 – Set The Cut Direction To “Conventional”
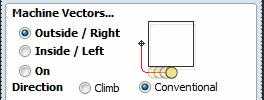
Because of the direction that the cutter is rotating, we get the best results setting the cut direction, or the direction that the machine will move the cutter, to “Conventional”, or Clockwise.
Guideline 7 – Use The Ramp Feature

Vectric programs all have the ability to set a ramp for each tool path. We recommend using a ramp when working with acrylic to allow the bit to enter the material at an angle as it lowers rather than plunging straight down. A smooth ramp of around 1-3 inches, depending on the size of the part, will give the best results.
Guideline 8 – Save Your Bit In The Tool Database
If using Vectric programs for your tool path creation, we recommend copying a 1/8″ end mill and renaming it “O-FLUTE FOR ACRYLIC” and then optimize your tool, settings for that tool. Now whenever you run acrylic again, you can simply reuse that tool and everything will be set for you.
Cutting Acrylic – 8 Guidelines To Get The Best Results